How to build VM on Mac (Apple M1/M2 chip) with VMware Fusion & Vagrant?
Apple recently unveiled the M1/M2 chip for their Macs and iPads, which offers a plethora of exciting features and benefits. However, for developers, creating and managing virtual machines on the Mac machine using familiar desktop hypervisors like VirtualBox proved to be a challenging task. Fortunately, after a long wait of about a year, a viable solution has finally emerged in the form of VMware Fusion and Vagrant. In this blog post, we will explore this solution in-depth.
Install VMware Fusion on Apple M1/M2 chip-based Mac machine
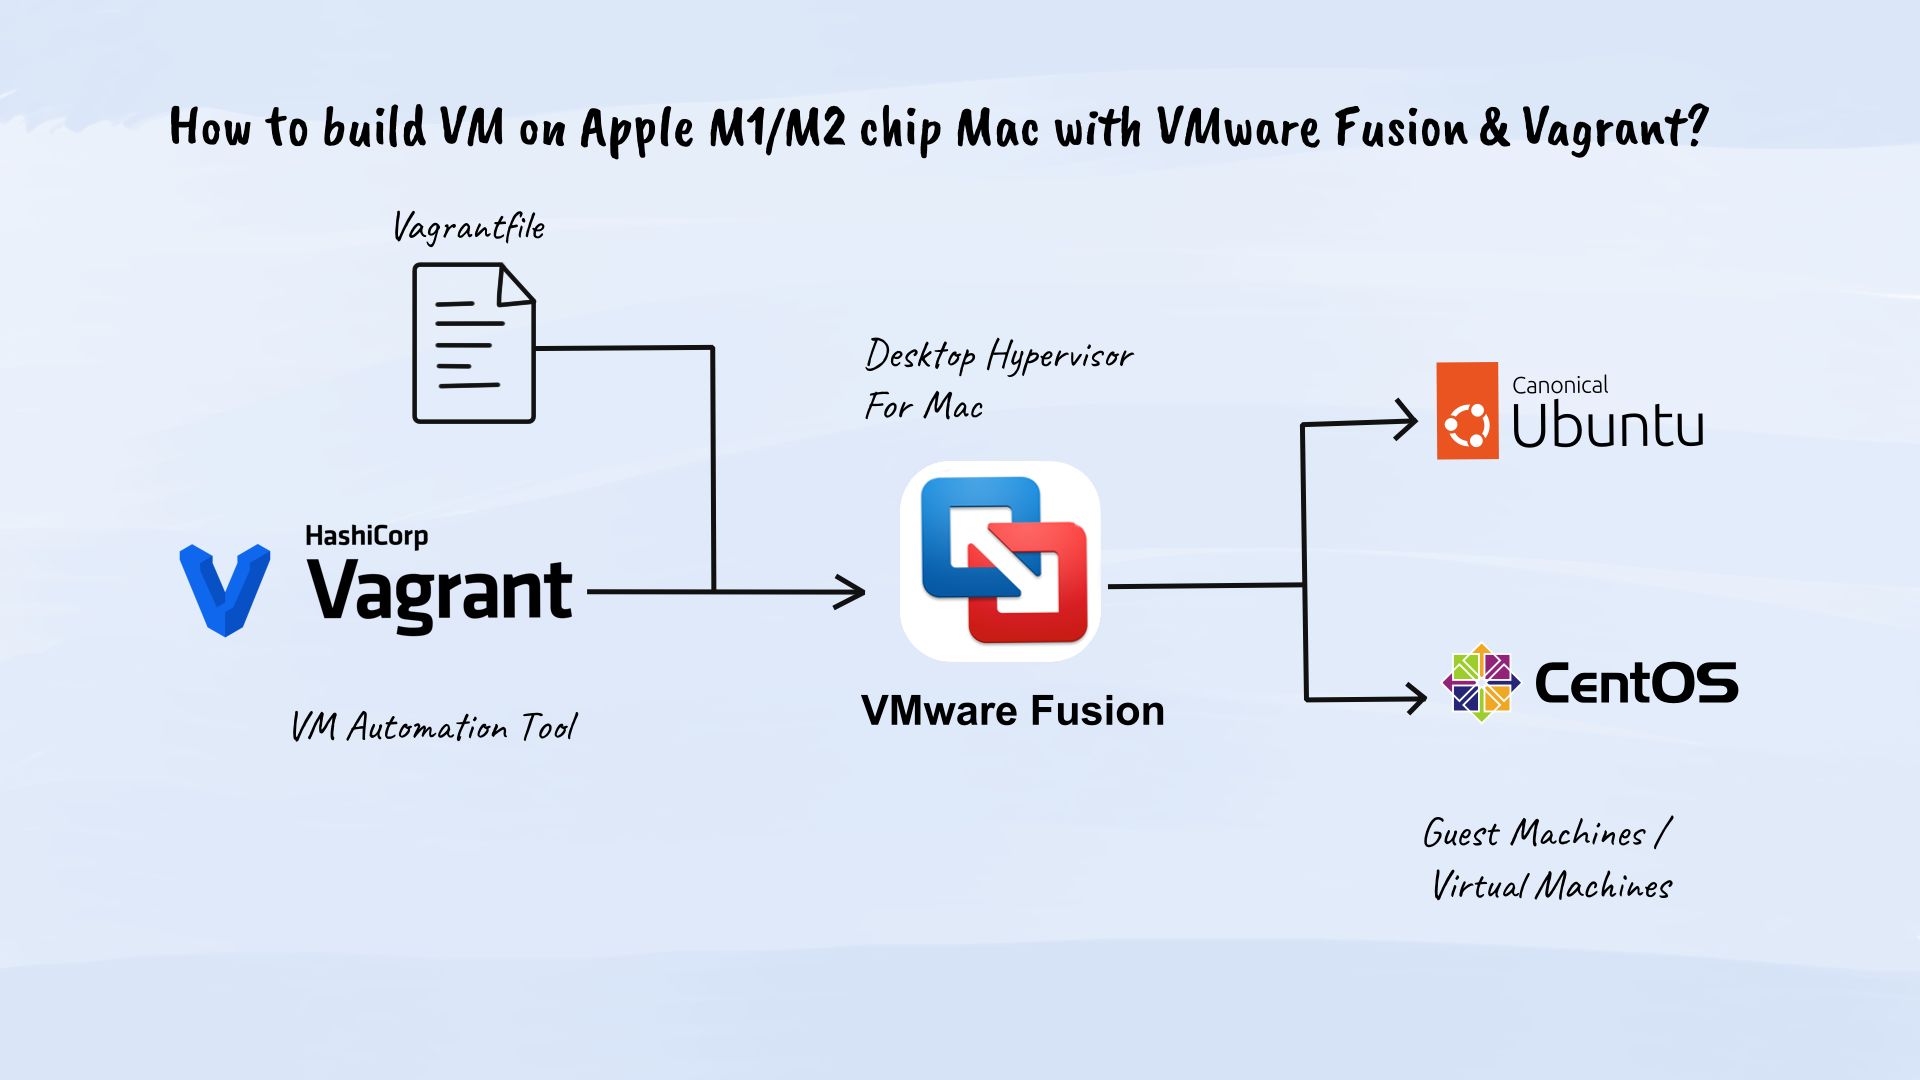
Generally, virtual machines are constructed utilizing hypervisor software. There exist two types of hypervisor software, namely bare metal hypervisors for cloud/on-premise computing and desktop hypervisors for personal computers. Desktop hypervisors are compatible with the majority of operating systems. VMware Fusion, a desktop hypervisor, is particularly designed for the Mac machine and can operate with both Intel and Apple M1/M2 chips. It is available in two variations - VMware Fusion Pro and VMware Fusion Player - and additional information about their distinctions can be found on their official websites.
- Go to the VMware Customer Connect registration page and fill in the required details with utmost accuracy. It is also important to confirm your email address to ensure the proper activation of your profile.
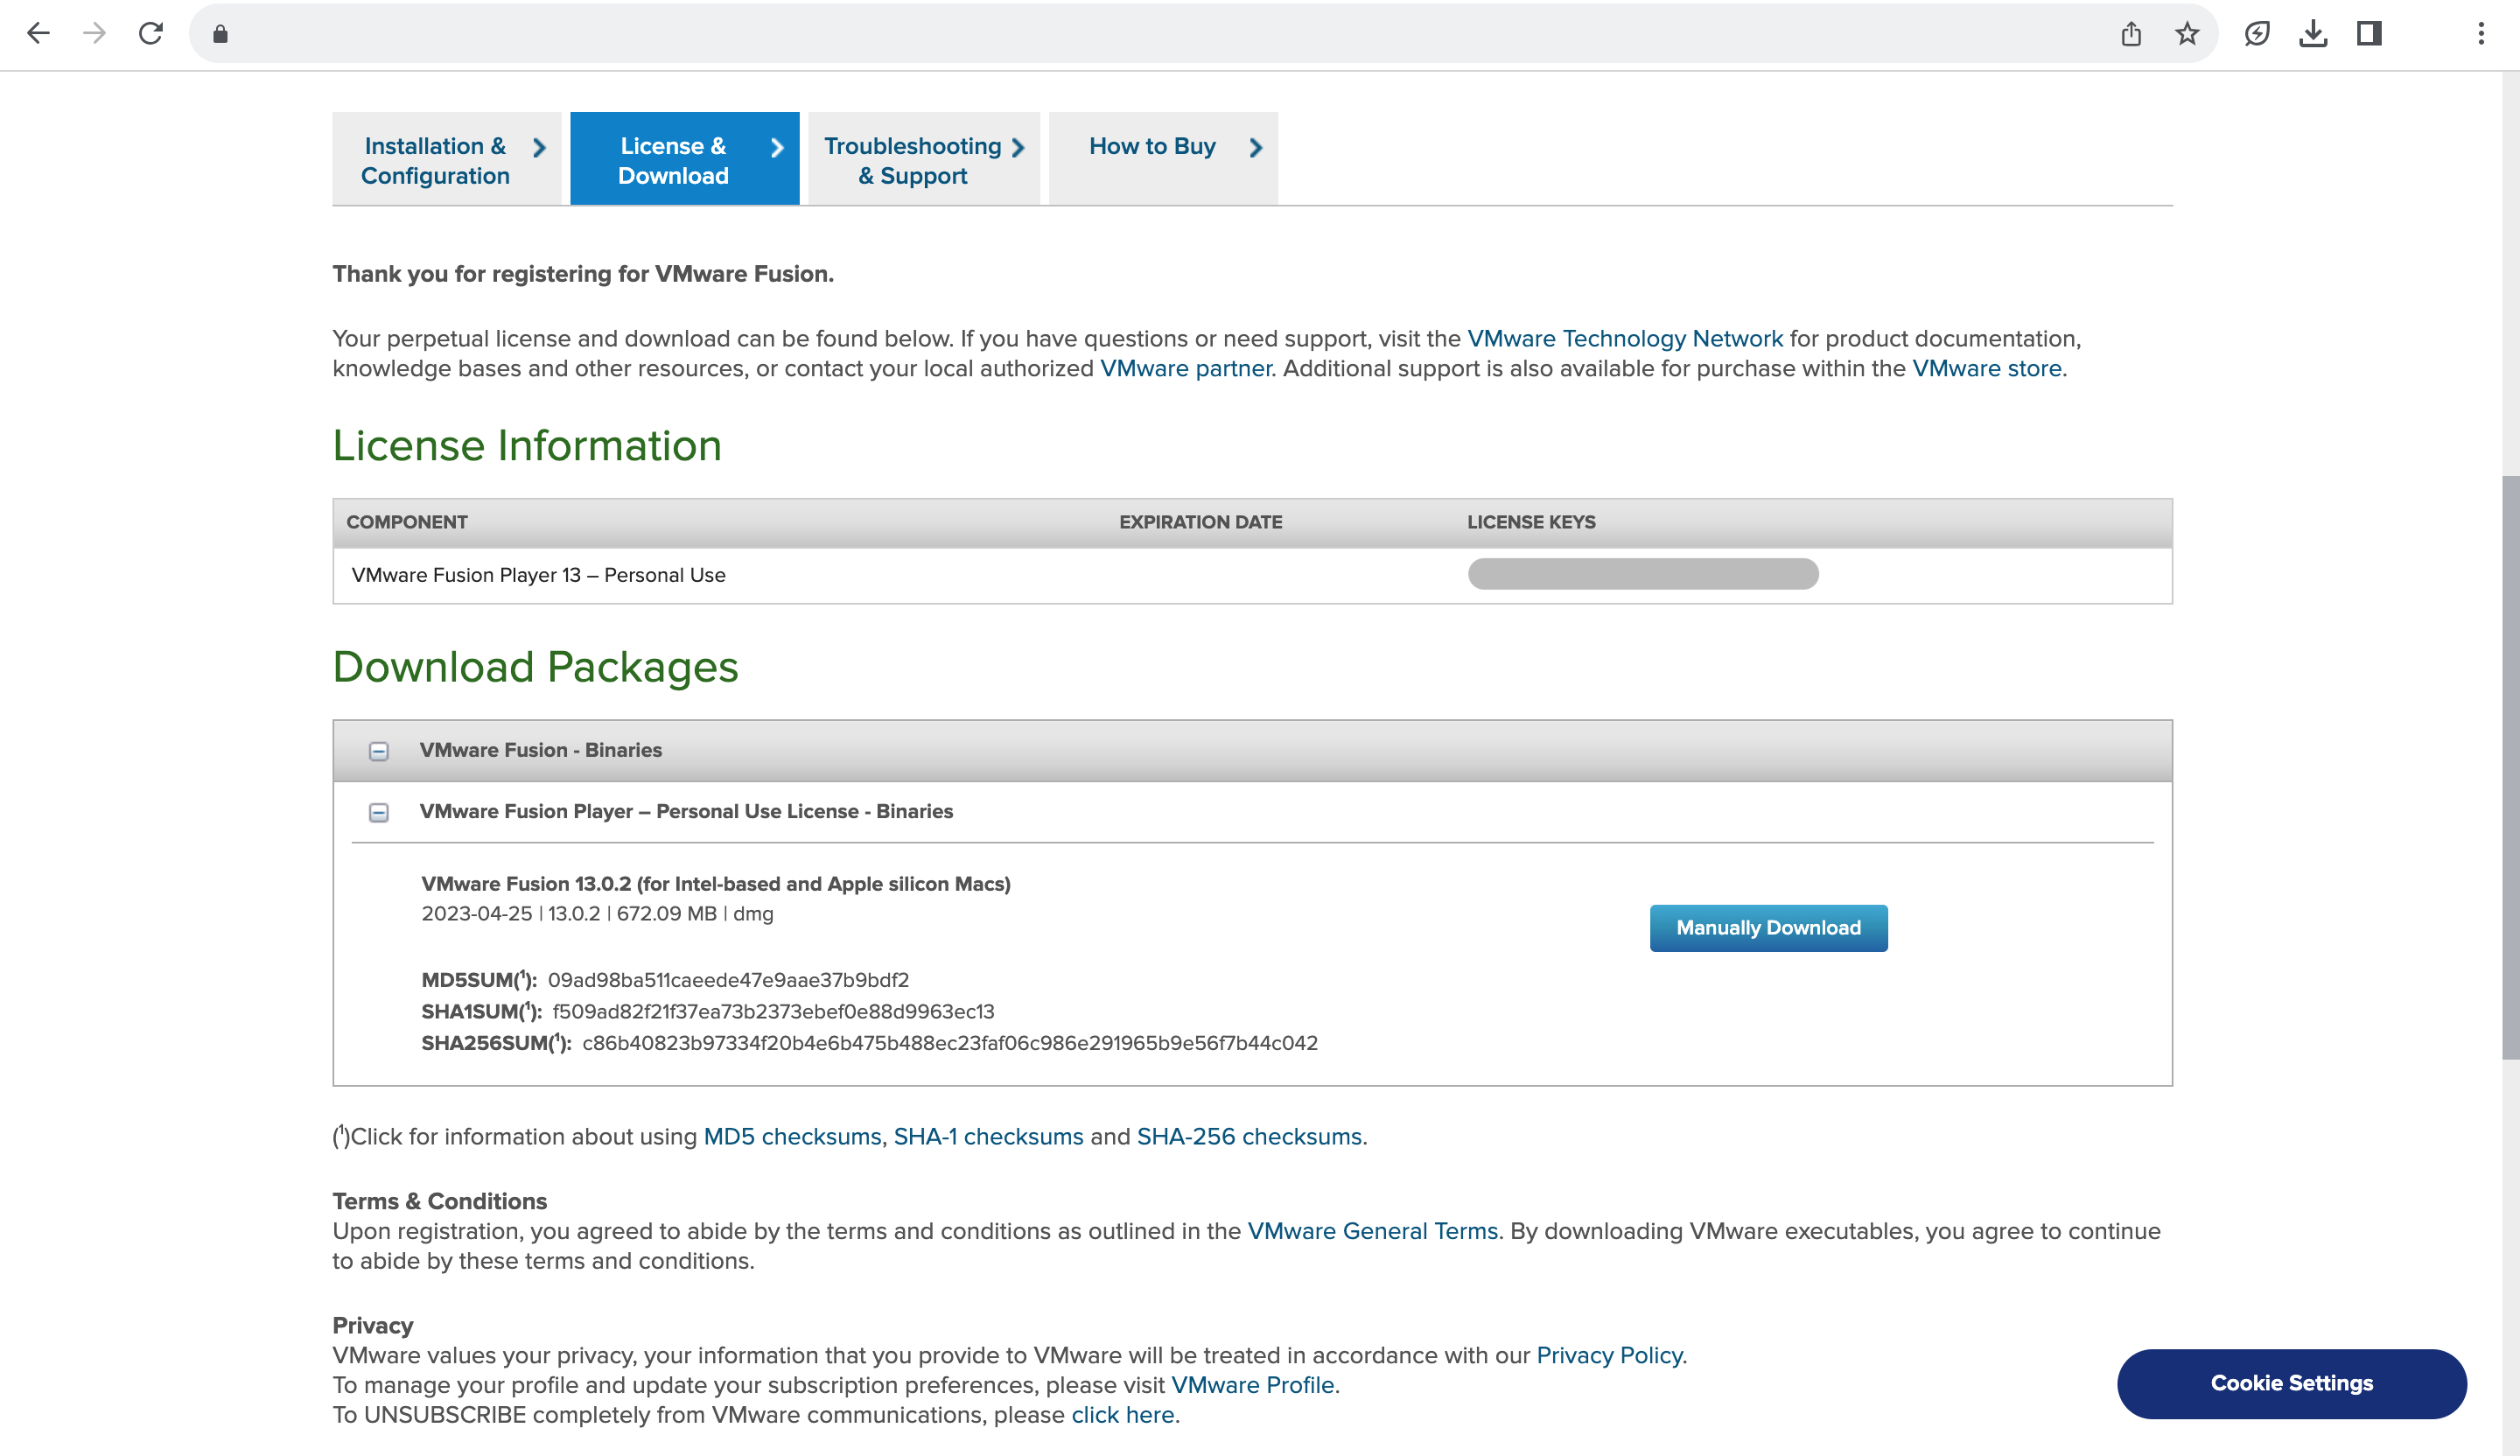
- Go to the VMware Fusion downloads page and choose the 13.0.2 version to download the VMware Fusion. If prompted, login to your VMware Customer Connect profile. If you do not have a profile, please create one.
- Open the Finder app and navigate to the Downloads directory in your Mac machine.
- Open the VMware Fusion package, then double-click the icon and follow the onscreen instructions.
- During the installation process, a license key prompt appears. Within the same window, you'll find a Get a Free License Key button. Simply click this button to obtain the personal use license key and complete the installation.
Install Vagrant and its plugins on Apple M1/M2 chip-based Mac machine
Vagrant is a highly useful tool developed by HashiCorp that simplifies the process of building and managing virtual machines. It provides a convenient and user-friendly interface for creating VMs on popular desktop hypervisors such as VirtualBox, VMware Workstation, Parallels, Hyper-V, VMware Fusion, among others. If you're working on a Mac machine with either Intel or Apple M1/M2 chips, Vagrant is the perfect solution for building your VMs.
Install Vagrant on Mac machine
- Download the Vagrant package.
- Open the Finder app and navigate to the Downloads directory in your Mac machine.
- Open the Vagrant package, then double-click the icon and follow the onscreen instructions.
In order to execute the following commands, you will need to access the default terminal application on your Mac machine.
      # Check Vagrant version.
      $ sudo vagrant --version
Install Vagrant VMware utility on Mac machine
- Download the Vagrant VMware utility package.
- Open the Finder app and navigate to the Downloads directory in your Mac machine.
- Open the Vagrant VMware utility package, then double-click the icon and follow the onscreen instructions.
Install Vagrant VMware provider plugin on Mac machine
In order to execute the following commands, you will need to access the default terminal application on your Mac machine.
      # Install VMware provider plugin for Vagrant.
      $ sudo vagrant plugin install vagrant-vmware-desktop
Build and manage VMs on Mac machine using VMware Fusion and Vagrant
Download the Vagrant VM configuration from our GitHub repository
At SloopStash, we strive to provide our audience with the utmost convenience when it comes to automating and building virtual machines on their Mac machines. That's why we offer comprehensive starter-kits that can be easily accessed from our official GitHub account. This starter-kit comes equipped with all the necessary Vagrant configurations that are required to streamline the VM building process using the VMware Fusion desktop hypervisor. In order to execute the following commands, you will need to access the default terminal application on your Mac machine.
      # Download Linux starter-kit from GitHub to local filesystem path.
      $ sudo git clone https://github.com/sloopstash/kickstart-linux.git /opt/kickstart-linux

      # Change ownership of Linux starter-kit directory.
      $ sudo chown -R $USER /opt/kickstart-linux
Manage VMs on Apple M1/M2 chip Mac using VMware Fusion & Vagrant
Our starter-kit also supports a wide range of Linux operating systems, including popular options such as Ubuntu, CentOS, Alma Linux, Rocky Linux, Amazon Linux, and many others. For example, if you're looking to build a Linux Ubuntu 22.04 server VM on your Mac operating system, our starter-kit provides you with step-by-step instructions to do so. We believe that our starter-kit is the perfect solution for those who are looking to automate and simplify the virtual machine building process on their Mac operating systems.
What sets our starter-kit apart is its compatibility with both Intel and Apple M1/M2 chips. This means that no matter what type of Mac machine you are using, you can rest assured that our starter-kit will work seamlessly on it. In order to execute the following commands, you will need to access the default terminal application on your Mac machine.
      # Switch to Linux starter-kit directory.
      $ cd /opt/kickstart-linux
Start VM
      # Boot Linux Ubuntu 22.04 VM using Vagrant.
      $ sudo VAGRANT_CWD=./vagrant/ubuntu-linux-22-04/vmware/arm64/server vagrant up
SSH to VM
      # SSH to Linux Ubuntu 22.04 VM using Vagrant.
      $ sudo VAGRANT_CWD=./vagrant/ubuntu-linux-22-04/vmware/arm64/server vagrant ssh
Halt VM
      # Halt Linux Ubuntu 22.04 VM using Vagrant.
      $ sudo VAGRANT_CWD=./vagrant/ubuntu-linux-22-04/vmware/arm64/server vagrant halt
Destroy VM
      # Destroy Linux Ubuntu 22.04 VM using Vagrant.
      $ sudo VAGRANT_CWD=./vagrant/ubuntu-linux-22-04/vmware/arm64/server vagrant destroy
We hope this article proves to be helpful to you. Thank you.